Saturday, October 27, 2012

Remove Write Protection On Pendrive Or Memory Cards

This Is A Very Common Error Most User Experience When They Want To Modify Or Delete The Contents From Pendrive.Sometimes It Also Comes When We Try To Write  Contents In A Write Protected Pendrive.

Removing Write Protection From
pendrive Is Tough Job,Even We Can't Able To Format A Write Protected Pendrive.If We Do So Then We Will Get A Error Like This.
Saying that
"The Disk Is Write-protected."
"Remove The Write-Protection Or Use Another Disk."
http://techwarlock.blogspot.in/2012/07/remove-write-protection-on-pendrive-or.html


But By Following This Article Can Help You to Remove Write Protection From Pendrives Or Memory Cards :)

So Here The
Trick To Remove Write Protection On Pendrive.

STEP 1:First Of All Click On Start.

STEP 2:Click On Run

STEP 3:Type Regedit And Press Enter.This Will Open A Registry Editor
.

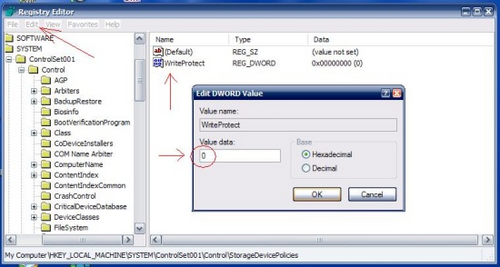
STEP 4: Navigate To
HKEY_LOCAL_MACHINE\SYSTEM\CurrentControlSet\Control\StorageDevicePolicies

STEP 5:Double click the key WriteProtect in the right pane and set the value Of Value Data Section to 0

As You Can See In Image Below.

http://techwarlock.blogspot.in/2012/07/remove-write-protection-on-pendrive-or.html


STEP 6: Click On Ok.

STEP 7: Exit Registry Editor And Restart Your Computer..


Done..Write Protection Is Removed From Pendrive... :)

Do i need a Registry Cleaner?

A Registry Cleaner simply helps to remove wrongly created references or invalid references pointing to a file (mostly a DLL file), a program or any other system data which does not exist anymore. These invalid references may be created due to one of the following reasons :
  • A system crash causing invalid entries
  • Poorly programmed Uninstaller leaving behind invalid entries
  • When a program is not uninstalled in a proper manner.
  • Or many other reasons.
These registry cleaner programs definitely clean the Windows registry. However comparing the benefits and dangers of these programs, I can say that these programs can be really dangerous if you don’t know what you are exactly doing. So if you are a beginner i would highly recommend not to use such programs on your windows computer. However if you are an advanced user and if you know what you are doing, then you can use registry cleaner at your own risk.

Can Registry Cleaner cause Problems in my Computer?

Yes. Registry Cleaners can cause trouble, especially if they are poorly programmed. In such a case where Registry Cleaner is poorly programmed, it can remove a valid reference in windows registry causing a program to stop working or in certain situations it can cause Windows to malfunction.

What to do without a Registry Cleaner?

  • If you encounter any problem in windows registry, you can always do a Google search for finding out the cause and solution to your problem.
  • You can also find troubleshooting guide for your windows version on Microsoft’s website.
  • You can perform regular system scans for viruses, spyware, malware, etc.

Which problems are fixed by Registry Cleaners?

  • Registry cleaners can fix problems like Missing DLLs, Unused file extensions, ActiveX and class issues, MUI Cache, Fonts, Obsolete softwares, etc.

I want to use a Registry Cleaner, Which one would you suggest?

If your problem is not fixed and still want to use a Registry Cleaner then I would suggest CCleaner. It is very simple and easy to use. There are many registry cleaners available out there, but i prefer CCleaner. You can also check out EasyCleaner if you don’t like CCleaner. Note that: Whenever you are messing up with Windows registry, Always use the registry backup feature of your Registry Cleaner. So in case if anything goes wrong you can always restore your backup.

Did you experience any problem using a Registry Cleaner?

  • Yes. I have faced many problems with different registry cleaners. However with CCleaner, the problems have been reduced to some extent.
  • After cleaning my windows registry, i faced a problem in which my webcam had stopped working. This was due to removal of driver references by registry cleaner. As you can see these were valid references, but registry cleaner failed to determine that these were valid and hence caused my webcam to malfunction.

Why is my Task Manager Disabled?

If you are not able to access your windows task manager by shortcut keys, you may try right clicking on your task-bar. It will display a context menu with the option of task manager in grey text. Which simply means its not clickable and is disabled.
This might happen if your computer user account is set to limited. If you are logged in as administrator and still not able to access task manager then your computer might be infected with spyware. This has changed some values in your system registry, thus disabling the task manager.

Now to enable the task manager all you have to do is access registry editor (regedit) and navigate to the following key (folder) :
HKEY_CURRENT_USER\Software\Microsoft\Windows\CurrentVersion\Policies\System

In the above image, you can see we have navigated to the System folder, wherein we can find DisableTaskMgr value. Just double click on it to change the value.  The value 0 means enable task manager while the value 1 means disable task manager. You can change the value and save it. Or you might as well delete the value. To delete the value, just click on DisableTaskMgr value and hit delete button.
I have been reported that some users are not having the ‘System’ folder in the specified directory. So here’s an alternative method for them. What we have to do is make use of the Group Policy Editor (gpedit.msc). This alternative method is only for Windows XP Users.
  1. Open start menu > run > type gpedit.msc > hit enter.
  2. Goto User configuration > Administrative Templates > System > Ctrl+Alt+Delete options.
  3. In the right panel, make sure that ‘Remove Task Manager’ is set to ‘disabled’ or ‘not configured’.
  4. If it is enabled. Then click on properties. And just click disable.
  5. Now your task manager must be back.
I hope you loved the post. If you have any doubt, feel free to comment below. Thanks.

How to check if windows is activated Permanently?

This is going to be a very short post, but quite useful one.

Now to check if your windows is activated permanently or on a temporary basis, you can just follow the instructions given below:
  • Open Command Prompt.
If you know how to open command prompt then move to step no 2.
In Windows XP: Goto Start menu > Open Run > Type cmd > Hit enter.
In Windows 7 and 8: Goto start > Type cmd > Hit enter.
  • Now enter the following command in the command prompt,
slmgr/xpr
  • And wait for a second
  • Then a dialog box will appear which will tell you the status of your windows activation.

I hope this post was helpful to you guys. And if you like this post, please subscribe to the blog feed. Also if you have any questions or doubts feel free to comment below.

Tuesday, October 23, 2012

Use Kaspersky internet security 2012 Lifetime without license key


HOW IT WORKS JUST  FOLLOW THESE 7 STEPS:-
  • First of all disconnect your internet connection and Remove modem or Disconnect that Ethernet Cable. it is very necessary that to get lifetime Key of Kasper sky internet security 2012 .(copy this post and save it to notepad)
  • Delete the existing key (If You Have)
  •  Now Open Kaspersky 2012 product Then Click on (Either KIS or KAV) settings
  • Un-check the “Enable protection” Check box
  • Go Then “Options’ In the settings window itself , And uncheck Below Line


    • a) “Enable Self-Defense”
    • ”Disable External service control”


  •  Goto Start>Run>Type “regedit”>
Now enter then find

HKEY_LOCAL_MACHINE>SOFTWARE>KasperskyLab>environment.

From Right list >> double click on “ProductStatus”

Then , in the “Value Data” Field . replace “Released” with “Beta” and click OK

  • Now again Open Kaspersky 2012 product And Go settings Now Check Below these check boxes :-
    • i)”Enable protection” (In “Protection” sub menu)
    • ii)”Enable Self-Defense” (In “Options” sub menu)
    • iii)”Disable External service control” (In “Options” sub menu)
    • Click on “OK”


  • Close the error message saying that “Protection is not running” .

Couse ot Error massage that, you have not installed any key and the product is not registered also
  •  Restart your PC !

NOTE:- You must Restart your PC Other then it will not work properly

Now , after restart , Open Your Kaspersky product .

Then click On License” (Somewhat in the middle in the bottom)

Click on “Activate new license”

then click on “Activate Beta License”

then click on “Next”

From Now You will Not Blacklist you will get 30 Days Genuine Key .Just click on Activate beta license and click on .Next . That's it The kaspersky server will give u an new 30 days genuine key . So Enjoy!!!

Recover Missing Folder Option

Many of us sometimes find the folder options missing in windows explorer.

Here's the solution
Open Run and then type "gpedit.msc".
Now goto
User Configuration > Administrative templates > Windows Component > Windows Explorer.

Click on Windows Explorer you will find the 3rd option on the right side of screen
"Removes the Folder Option menu item from the Tools menu"

Just check it,

if it is not configured then change it to enable by double clicking on it and after applying again set it to not configured.

I hopes that you will find the option after restarting windows. :)

100 Windows XP RUN COMMANDS


[COLOR="LemonChiffon"]eg:- Go to


StartMenu>RUN> "Command "
Accessibility Controls

access.cpl

Add Hardware Wizard

hdwwiz.cpl

Add/Remove Programs

appwiz.cpl

Administrative Tools

control admintools

Automatic Updates

wuaucpl.cpl

Bluetooth Transfer Wizard

fsquirt


Calculator

calc

Certificate Manager

certmgr.msc


Character Map

charmap

Check Disk Utility

chkdsk

Clipboard Viewer

clipbrd

Command Prompt

cmd

Component Services

dcomcnfg


Computer Management

compmgmt.msc

Date and Time Properties

timedate.cpl

DDE Shares

ddeshare

Device Manager

devmgmt.msc

Direct X Control Panel (If Installed)*

directx.cpl

Direct X Troubleshooter

dxdiag

Disk Cleanup Utility

cleanmgr

Disk Defragment

dfrg.msc

Disk Management

diskmgmt.msc

Disk Partition Manager

diskpart

Display Properties

control desktop

Display Properties

desk.cpl

Display Properties (w/Appearance Tab Preselected)

control color

Dr. Watson System Troubleshooting Utility

drwtsn32

Driver Verifier Utility

verifier

Event Viewer

eventvwr.msc

File Signature Verification Tool

sigverif

Findfast

findfast.cpl

Folders Properties

control folders

Fonts

control fonts


Fonts Folder

fonts

Free Cell Card Game

freecell

Game Controllers

joy.cpl


Group Policy Editor (XP Prof)

gpedit.msc

Hearts Card Game

mshearts

Iexpress Wizard

iexpress

Indexing Service

ciadv.msc

Internet Properties

inetcpl.cpl

IP Configuration (Display Connection Configuration)

ipconfig /all

IP Configuration (Display DNS Cache Contents)

ipconfig /displaydns

IP Configuration (Delete DNS Cache Contents)

ipconfig /flushdns

IP Configuration (Release All Connections)

ipconfig /release

IP Configuration (Renew All Connections)

ipconfig /renew

IP Configuration (Refreshes DHCP & Re-Registers DNS)

ipconfig /registerdns

IP Configuration (Display DHCP Class ID)

ipconfig /showclassid

IP Configuration (Modifies DHCP Class ID)

ipconfig /setclassid

ava Control Panel (If Installed)

jpicpl32.cpl

Java Control Panel (If Installed)

javaws

Keyboard Properties

control keyboard

Local Security Settings
secpol.msc

Local Users and Groups

lusrmgr.msc

Logs You Out Of Windows

logoff

Mcft Chat

winchat

Minesweeper Game

winmine

Mouse Properties

control mouse

Mouse Properties

main.cpl

Network Connections

control netconnections

Network Connections

ncpa.cpl

Network Setup Wizard

netsetup.cpl

Notepad

notepad

Nview Desktop Manager (If Installed)

nvtuicpl.cpl

Object Packager

packager

ODBC Data Source Administrator

odbccp32.cpl

On Screen Keyboard

osk

Opens AC3 Filter (If Installed)

ac3filter.cpl

Password Properties

password.cpl

Performance Monitor

perfmon.msc

Performance Monitor

perfmon

Phone and Modem Options

telephon.cpl

Power Configuration

powercfg.cpl


Printers and Faxes

control printers

Printers Folder

printers

Private Character Editor

eudcedit

Quicktime (If Installed)

QuickTime.cpl

Regional Settings

intl.cpl

Registry Editor

regedit

Registry Editor

regedit32

Remote Desktop

mstsc

Removable Storage

ntmsmgr.msc

Removable Storage Operator Requests

ntmsoprq.msc

Resultant Set of Policy (XP Prof)

rsop.msc

Scanners and Cameras

sticpl.cpl

Scheduled Tasks

control schedtasks

Security Center

wscui.cpl

Services

services.msc

Shared Folders

fsmgmt.msc

Shuts Down Windows

shutdown

Sounds and Audio

mmsys.cpl

Spider Solitare Card Game

spider

SQL Client Configuration

cliconfg

System Configuration Editor

sysedit

System Configuration Utility

msconfig

System File Checker Utility (Scan Immediately)

sfc /scannow

System File Checker Utility (Scan Once At Next Boot)

sfc /scanonce

System File Checker Utility (Scan On Every Boot)

sfc /scanboot

System File Checker Utility (Return to Default Setting)

sfc /revert

System File Checker Utility (Purge File Cache)

sfc /purgecache

System File Checker Utility (Set Cache Size to size x)

sfc /cachesize=x


System Properties

sysdm.cpl

Task Manager

taskmgr

Telnet Client

telnet

User Account Management

nusrmgr.cpl

Utility Manager

utilman

Windows Firewall

firewall.cpl

Windows Magnifier

magnify

Windows Management Infrastructure

wmimgmt.msc

Windows System Security Tool

syskey

Windows Update Launches

wupdmgr

Windows XP Tour Wizard

tourstart

Wordpad

write

Common Errors in PC & There Solution

1. MONITOR LED IS BLINKING
Check all the connections like Monitor Cable, Data cables,RAM, Display Card , CPU connections.

2. CONTINUOS THREE BEEPS
Problem in RAM Connection.

3. THREE BEEPS ( 1 Long 2 Short)
Problem in Display Card Connection

4. THREE LONG BEEPS PERIOD WISE
Problem in BIOS or RAM (Basic Input Output System)

5. CONTINUOS NON-STOP BEEPING
Key Board Problem (I.e.; Some Key is pressed for Longer time)

6. FDD LED IS GLOWING CONTINUOSLY
Data cable to be connected properly (twisted cable).

7. NO DISPLAY ON THE SCREEN AT ALL
Hard Disk cable connected wrongly. Connect rightly seeing the Red mark (Faces power supply) and then Restart.

8. POWER LED IS OFF
a. Check main power cord
b. Check S.M.P.S.
c. Check Mother Board connection

9. SHOWING CMOS ERROR
Replace 3 Volt battery of Mother Board . Set Original Settings Manually.(Refer CMOS Setup chart)
Enter your search termsSubmit search form

10. SHOWING FDD ERROR OR FLOPPY DRIVE IS NOT WORKING PROPERLY
Check Power cord of FDD , Data Cables , set CMOS & Finally the Check drive.

11. SHOWING HDD ERROR OR HARD DISK FAILURE
a. Check Power Cord
b. Check connection of HDD
c. Check Data cable
d. Check Hard Disk parameters in CMOS or Auto detecting Setting Partitions by Fdisk Command, then format it to set track 0.

12. MOTHER BOARD HANGS DUE TO UNSTABILIZED POWER SUPPLY
a. Check S.M.P.S
b. RAM not functioning properly.
c. Software problem (due to using pirated software)
d. CPU fan not functioning properly.

13. DANCING SCREEN
a. Check Display card connection
b. Virus Problem
c. Video Memory Problem

14. SHAKING SCREEN
a. Earthing problem
b. Magnetic waves comes around.

15. CPU CABINET SHOCK
a. Check Earthing
b. Check main power cord.

16. NON-SYSTEM DISK ERROR
a. Floppy Drive having different disk (Non-Bootable Disk) OR CMOS Parameters for Hard Disk may not be set properly.
b. Hard Disk Partitions may not be created.
c. Hard Disk may not be formatted.

7. MISSING OPERATING SYSTEM
The System files missing namely Ie; command.com} - User File IO.SYS & MS_DOS.SYS } - Hidden Files. These above three files required for Start up of the system that can be transferred by using SYS C: Command OR While the time of formatting by using Format c:/u/s

18. MISSING COMMAND INTERPRETOR
May the file Command.com is corrupted OR Infected by Virus OR Some one has Erased it.

19. SHOWING I/O ERROR
a. The type of Hard Disk in CMOS may not be set properly.
b. Operating system used for formatting is not valid

20. SHOWING DIVIDE OVER- FLOW MESSAGE
a. May some Directories or Files crash with other files.
b. Use CHKDSK/F or SCANDISK Command to correct it.

21. HARD DISK MAKING NOISE WHILE PROCESSING
a. Unstabilized power supply.
b. Check for Loose Contact.
c. Do not use Y Connectors for Hard Disk.
d. It may create Bad Sector OR Weak Hard Disk.

22. HARD DISK HANGS WHILE PROCESSING
Check for Bad Sector by using CHKDSK or SCANDISK Command. If found format the Hard Disk and set Partition before that area.(This is the only procedure to use Hard Disk with Bad Sector) OR (To avoid Bad Sectors use Standard Power Supply)

23. HARD DISK NOT DETECTED
a. Check Power Connector
b. Check Data Cables
c. Check Jumpers

24. PARTITION NOT SHOWN
Operating System where the Hard Disk formatted is not supported with present Mother Board. For Eg: Hard Disk formatted with Pentium System will hide their partitions for 486 System.

25. MMX/DLL FILE MISSING
May the above files may be corrupted due to power failure or Virus. Make available above files from other Computer. OR Reinstall Windows 98 Operating System. (This procedure will not make any effect on existing Data).

26. WINDOWS REGISTRY ERROR
This will happen due to sudden ON/OFF of the system. Final solution is to Reinstall Operating System.

27. DISPLAY COLOUR DOES NOT MATCH
a. Configure Display Card properly with their CD.
b. The Standard setting for Windows is set it to 800x600 for better performance.

28. UNKNOWN DEVICE FOUND
May the Driver utility is not provided with operating system . Insert Driver CD and install software for the above Device. (Every Device requires driver utility to set active

Saturday, October 20, 2012

remotly shutdown the another computer

if you are getting bored then try this at Cafe, School,college, or at Universty

1.Find out the IP address of the server by running d cmd 'net view'
2. u wl get ip add as well as PC name
3.now type shutdown -i
4.now click on add and type the name of pc
5.do the setting whatever u want
6.u will remotly shutdown the another computer...........................................................

TRY THIS

Find the IP address of another networked computer

In Windows, how can I find the IP address of another networked computer?

In Windows 7, Vista, and XP, you can find the IP address of another networked computer by using the nslookup utility. Using the fully qualified domain name (FQDN) of a networked computer, nslookup will query a DNS server and return the IP address that corresponds to that domain name.

To find the IP address of another comput...
er:

In Windows 7 and Vista, in the Start menu, type cmd in the "Start Search" field.

In XP, from the Start menu, select Run... . In the "Open:" field, type cmd and press Enter.
At the command prompt, type nslookup plus the domain name of the computer you want to look up, and press Enter. For example, to find the IP address for www.indiana.edu, you would type: nslookup www.indiana.edu

This command will return the following information:
Server: ns.indiana.edu Address: 129.79.1.1 Name: indiana.edu Address: 129.79.1.61

The first two lines show the domain name and IP address of the DNS server that answered the nslookup query. The next two lines show the domain name and IP address of the computer for which you were searching.
When you're finished, type exit and press Enter to return to Windows.

Thursday, October 18, 2012

Transfer Installed Software To Another Computer

Usually what we do? we install all the software's & utility again in our new system & also have to set settings for it. Oh yaa what to do when you don’t have setup of the particular software you want to install or want to give your friend? mostly it happened to me that I have software installed in my pc & my friend ask me for that software and when I came back to my home I got to know that the software he asked for its installed in my pc but don’t have setup of it…guys I’m telling you it sucks..So what to do now?


Today I’m going to tell about a software which will help you to perfome task like drag n drop. not exactly this utility will help you to pick software from one pc to another and both works same. and will help to setup your new system. & no worry about about the setup. who cares about it when you have a cool utility like “PICK ME APP”. Yes guys this is the software will gonna helps you a lot I’m dam sure…


You Can Download This Software for free from : Pick Me App


Get Windows 7 Thumbnails More Bigger

Again I have a great stuff for today. This trick will help you change the size of thumbnails ( if you do not like the default, make it bigger).
     
 So Here We Go...
Trick Gonna Be Done By : Registry Editor
  • Step 1: Launch the Run dialog box by using Windows + R/Click on start & type  or execute the command regedit to pull up Registry Editor.
  • Step 2: Now go to HKEY_CURRENT_USER -> Software -> Microsoft -> Windows -> CurrentVersion -> Explorer -> Taskband.
  • Step 3: On the right side of the editor, right-click on the Taskband folder and>> create      a New DWORD (32-bit) Value and name it>> "MinThumbSizePx"
  • Step 4: Now, right click on this DWORD and choose to Modify its value.
  • Step 5: Select the Decimal  radio button key in a value of your choice to determine the size of thumbnails. I have it set to 1000.

Monday, October 15, 2012

Connect Two Windows 7 Computers On LAN Using Ethernet Cable

There are times when you want to transfer your important files and documents from one computer to another. Especially, if you are to manage multiple computers on your home network or a workgroup, transferring files between them becomes tedious. Though you can use the following alternatives to transfer data.

1. The mostly used media to transfer files or documents is removable disk (USB drive). But the drawback of the removable media is that if you want to transfer a large amount of data, you need to divide that in various part as the total data would not fit in the limited space of your USB drive. It is also slow comparatively with the hard disk.

2. You can use Dropbox to sync files across multiple computers. Dropbox is a great tool but it is useless with out an internet connection.

Hence, you should use a fast, reliable and all time available way. One of the best choice to transfer files between two Windows computers is connecting them with an Ethernet cable.

The Ethernet cable is nothing but a simple cable connected with RJ45 clips at both ends. Bu it comes with two different configuration.
1. Straight-through cable.
2. Crossover cable.

You can see the configuration diagram of both types from the following image.


(image credit)

Where the crossover cable can be used only for file transferring, the straight-through cable can be used in various purposes.

Here I will discuss how to connect two Windows computers on LAN though an Ethernet crossover cable and how to transfer files, folders, videos, pictures, images etc. between them.

Create a Home network using an Ethernet crossover cable

Things that you’ll need:
1. A crossover or straight-through cable. This time I am using the crossover cable.
2. Supported network card in both computer.
3. Both of the computers should have the Ethernet driver installed in it.

Configuring the computers

Below are the steps involved in configuring your computer to connect them on a LAN using Ethernet cable.
Step 1. In order to start the connection, you’ll have to assign different IP address for both computers. To change the IP address of your computers for the LAN connection, you should make changes in the LAN adapter settings.
  • Open Control panel from the start menu and click on Network and Internet and click on Network and Sharing center.
  • From the left sidebar, click on Change adapter settings.

  • Under the Network connections window select the appropriate icon for your LAN adapter and right-click on it, then choose Properties.

  • A Local Area Connection Properties box appears.

  • Under the Network tab select Internet Protocol Version 4 (TCP/IPv4) and click on the Properties button.
  • Now set the addresses as mentioned below in each computer and click OK.
At the first computer ( say, Computer 1):
IP address:       192.168.0.1
Subnet mask:  255.255.255.0
At the second computer ( say, Computer 2):
IP address:       192.168.0.2
Subnet mask:  255.255.255.0


Step 2. Now, connect one end of the cable into the Ethernet port of Computer 1 and the other end with the same of the Computer 2 and apply the following steps in both the computers.
  • Right-click on Computer from the start menu and select Properties.
  • The system properties Control Panel window opens as shown below.

  • Click on Change settings and the System properties dialog box appears. under the Computer Name tab, click on on the Change button to assign a WORKGROUP. Assign the same workgroup name for both computers otherwise it won’t work.


Restart each computer. It does not matter which computer you restart first. After starting both the computer, double-click on the Computer icon at the start menu and then click on Network from the left side of the explorer window.

In the computer 1, you should see an icon denoting your second computer’s name under the Network window. Similarly, you can see that the first computer has been appeared under the Network window of your second computer.


If they do not appear, you should get a message prompting to turn on Network Discovery and file Sharing. Click that security pop-up and select “make the network a private network”. In case, you may have to restart your computers.


Once you see the other computer in your Network computer window, just double click on it. If the other computer is password protected, you will have to enter the exact user name and password of that computer to get access of the shared folder.

If you want to share some files or folder of a computer with the other computer on the network, right-click on that and select Share with > Homegroup. Even you can share a total drive by right-clicking on it.


Let me know if you face any problem when sharing files between two computers on LAN.

Why Intel Processor is better than AMD Processor?

 
Intel is one of the world’s largest and highest valued semi-conductor chip maker. Intel is a combination of two words that is Integrated Electronics.
 
Intel deals in the manufacturing of chipsets, motherboards, network interface controllers and a lot more devices. The premier chip maker i.e. Intel for personal computers-companies such as Apple, Dell, HP, Samsung, Sony have product lines that depend on the processors that Intel produces. Intel’s processors offers the best performance for all-around usage.
 
AMD(Advance Micro Devices) is a semi-conductor company that provides processors and related technologies like motherboards, chipsets, graphic procesors , handheld devices and many more. AMD was considered to be the second largest supplier of X86 Architecture and third largest supplier of graphic processors. For many leading processors technologies like AM2900, AMD 29K, AMD7910 and AMD7911, AMD is the only manufacturer.
 
An important feature of AMD processor is Advance Clock Calibration which alters the internal settings of the computer by allowing individual settings of the core and the CPU. Another important features are AMD virtualization , which is known as the virtual extension of AMD 86 processors and Enhanced virus protection.
 

Comparison of Intel Processors with AMD Processors

As Intel’s main competitor is AMD which presents high-quality parts, insistently cost so there are some reasons why an Intel CPU is better for specific requirements.
 

1. Power Consumption

The power consumption of Intel Processors is 2 times less than that of the AMD processors.

2. Heat Generation

Intel has set a benchmark for producing less heat due to its less power consumption while AMD produces more heat as it consumes more power.

3. Compatibility

As Intel is one of the largest company for producing a wide variety of motherboards, chipsets etc. so it is easier for a person to find any product at a lower cost than that of AMD.

4. Intergrated Memory Controllers

As Intel has core i7 processors so they permit higher performance ceiling than that of AMD processors.

Market Share of Intel and AMD Processors

The market share of Intel processor is obviously much more than the AMD processors. Only the professionals have the knowledge of the AMD processors. The wide scale production and promotion of Intel processors is the only reason that even a layman knows that which processor to order. Besides the price of Intel processors is high it is preferred over the AMD processors. Moreover AMD is losing its market share to Intel Processor. The market share of Intel is about 80.2 % while leaving only 18.2% share for AMD. The core 2 duo processor of Intel left it far behind and again proved its lead in the processor market.

Tuesday, October 9, 2012

ACTIVATE WINDOWS XP WITHOUT ANY PRODUCT KEY AND SOFTWARE

hi guys this is nice to activate ur windows xp without any product key or any software. so follow some simple steps which i mentioned below and be a smart user......
STEPS :-
1.) Click on Start.

2.) Find and Click “Run”

3.) Type regedit

 4.) Click the plus next to “HKEY_LOCAL_MAC HINE”

5.) Click the plus next to “SOFTWARE”
 
6.) Click the plus next to “Microsoft”

7.) Click the plus next to “Windows NT”

8.) Click the plus next to “CurrentVersion ”

9.) Click “WPAEvents”

10.) On the right panel, find “OOBETimer” then double click it.
 
11.) Now, Delete all the Values by highlighting it, then delete it

 12.) Then type in this value without the quotation mark “FF D5 71 D6 8B 6A 8D 6F D5 33 93 FD”

13.) Then after that click OK,

 14.)Then on the left panel right click WPAEvents, then click on permissions

 15.) Then click System or SYSTEM , then Deny Full Control, then Click OK.

 16.) Then Exit Registry Editor by Click the X or the red X on the Upper Right of the Title Bar or press ALT and F4 at the same time.

 17.) To Very that it works, go to start, then “activate windows”, or go to start, then all programs, then “activate windows”

If it says that Windows has been activated.
I hope you will like this trick


Tuesday, October 2, 2012

Windows XP Run Commands

Windows XP Run Commands

Run commands:

Calc - Calculator
Cfgwiz32 - ISDN Configuration Wizard
Charmap - Character Map
Chkdisk - Repair damaged files
Cleanmgr - Cleans up hard drives
Clipbrd - Windows Clipboard viewer
...
Cmd - Opens a new Command Window (cmd.exe)
Control - Displays Control Panel
Dcomcnfg - DCOM user security
Debug - Assembly language programming tool
Defrag - Defragmentation tool
Drwatson - Records programs crash & snapshots
Dxdiag - DirectX Diagnostic Utility
Explorer - Windows Explorer
Fontview - Graphical font viewer
Ftp - ftp.exe program
Hostname - Returns Computer's name
Ipconfig - Displays IP configuration for all network adapters
Jview - Microsoft Command-line Loader for Java classes
MMC - Microsoft Management Console
Msconfig - Configuration to edit startup files
Msinfo32 - Microsoft System Information Utility
Nbtstat - Displays stats and current connections using NetBios over TCP/IP
Netstat - Displays all active network connections
Nslookup - Returns your local DNS server
Odbcad32 - ODBC Data Source Administrator
Ping - Sends data to a specified host/IP
Regedit - registry Editor
Regsvr32 - register/de-register DLL/OCX/ActiveX
Regwiz - Reistration wizard
Sfc /scannow - Sytem File Checker
Sndrec32 - Sound Recorder
Sndvol32 - Volume control for soundcard
Sysedit - Edit system startup files (config.sys, autoexec.bat, win.ini, etc.)
Systeminfo - display various system information in text console
Taskmgr - Task manager
Telnet - Telnet program
Taskkill - kill processes using command line interface
Tskill - reduced version of Taskkill from Windows XP Home
Tracert - Traces and displays all paths required to reach an internet host
Winchat - simple chat program for Windows networks
Winipcfg - Displays IP configuration

Monday, October 1, 2012

Snapshots of the rounded corner

This tool is really a great tool and is more advanced. It can also take snapshots of the rounded corner. You can also emphasize on a particular portion by making it lighter and doing other portions darker as shown in the side figure. Download the tool from below.

 Situations: This tool has a lot of awesome features. I can not mention all the features at this time. I have given you the link just above, read all of its features. After visiting the above link you will automatically know in which situation you will need this tool.See More


Photo: This tool is really a great tool and is more advanced. It can also take snapshots of the rounded corner. You can also emphasize on a particular portion by making it lighter and doing other portions darker as shown in the side figure. Download the tool from below.

Download link:http://www.ntwind.com/software/winsnap/download.html
More info. about features:www.ntwind.com/software/winsnap.html

Situations: This tool has a lot of awesome features. I can not mention all the features at this time. I have given you the link just above, read all of its features. After visiting the above link you will automatically know in which situation you will need this tool.

Unitek USB 3.0 HDD Docking Station

Want to connect additional hard disk drives with computer, and backup your data? Take a look at the following Unitek USB 3.0 HDD docking station, maybe the adapter can meet your requirements.
Unitek USB 3.0 HDD Docking Station
This is a simple and practical HDD docking station that measures 98 x 69 x 18mm and weights 74g. As we can see from the images, the HDD dock features ultra portable design, and comes with three hard disk drive connectors in order to fit for 2.5″/ 3.5″ SATA HDD, 2.5″ IDE HDD and 3.5″ IDE HDD, and the integrated IDE HDD power output and DC input are able to provide steady current for your hard disk drives. Moreover, the USB 3.0 port supports up to 50Gbps of data transfer rate, and the one-touch backup button allows you to backup your data with ease.
Unitek USB 3.0 HDD Docking Station
The USB 3.0 HDD docking station is priced at $40 USD. (In India Rs 2200-2500)
Unitek USB 3.0 HDD Docking Station Unitek USB 3.0 HDD Docking Station
Additionally, if you need other options, you might like to check Quadruple HDD docking station and more via “docking station” tag.